Last Updated on January 8, 2024 by GeeksGod
Course : Javascript Build a Calculator using HTML, CSS and Javascript
Part 1: Download and Install Notepad++
Before we begin, make sure you have Notepad++ installed on your computer. Notepad++ is a popular text editor that is highly recommended for coding purposes. It offers various features that will make coding easier and more efficient.
To download Notepad++, go to their official website and look for the download page. Choose the appropriate version for your operating system (Windows, Mac, or Linux) and follow the instructions to install it on your computer.
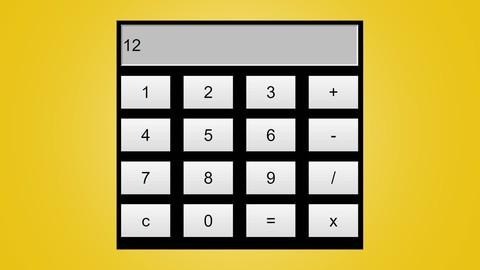
Part 2: Building the Basic Functionality of the Calculator
Now that you have Notepad++ installed, let’s start building the basic functionality of the calculator. We will use HTML, CSS, and Javascript to create the calculator interface and add the necessary functionalities.
First, open Notepad++ and create a new HTML file. You can do this by clicking on “File” > “New” and selecting “HTML” from the options. This will create a basic HTML structure for your project.
Next, add the necessary HTML elements for the calculator interface. You can use tables, divs, or any other HTML elements to create the structure of the calculator. Make sure to add the necessary classes and IDs for styling and functionality.
After creating the HTML structure, it’s time to add the CSS styling to make the calculator visually appealing. You can use CSS to customize the colors, fonts, and layout of the calculator. Add the necessary CSS code between the <style> tags in the HTML file.
Now comes the most important part – adding the Javascript code to implement the calculator’s functionality. You can use Javascript to handle the user inputs and perform the necessary calculations. Add the necessary Javascript code between the <script> tags at the bottom of your HTML file.
With these steps completed, you should now have a basic calculator that can perform simple calculations. You can test it out by entering numbers and operators, and see if it gives the correct results.
Part 3: Fixing Problems in the Calculator Project
While building the calculator, you may encounter some problems or errors. Don’t worry, it’s a normal part of the learning process. In this part, we will focus on identifying and fixing common problems in the calculator project.
One common problem you may encounter is incorrect calculation results. This can happen due to a mistake in the Javascript code or logic errors. Use console.log statements to debug and identify the source of the problem. Once you find the issue, fix it and test the calculator to ensure it gives accurate results.
Another common problem is the calculator’s responsiveness. A good calculator should be able to adjust its layout and functionality based on the device or screen size. Use media queries and responsive design techniques to make the calculator work seamlessly on different devices and screen sizes.
Part 3 also includes advanced functionalities, such as implementing decimal numbers, handling keyboard inputs, and adding memory functions. These features will make your calculator more user-friendly and versatile.
Part 4: Focusing on Design (CSS)
In the final part of the course, we will focus on the design aspect of the calculator. CSS plays a crucial role in making your calculator visually appealing and user-friendly. We will explore different CSS techniques and tricks to enhance the overall look and feel of the calculator.
Start by analyzing the current design of your calculator and think about how you can improve it. Experiment with different color schemes, fonts, and button styles to find the best combination that suits your preference. Test the changes and keep iterating until you are satisfied with the design.
Don’t forget to make your calculator responsive and compatible with different devices and browsers. Use CSS media queries to adjust the layout and font sizes based on the device’s screen size. Test your calculator on different devices to ensure a consistent user experience.
Once you have completed the design improvements, make sure to test the calculator thoroughly to ensure all functionalities are working as expected. This includes testing different scenarios, edge cases, and user inputs to identify and fix any remaining issues.
Pre-Requirements
Before enrolling in this course, make sure you have a basic understanding of HTML, CSS, and Javascript. Familiarize yourself with the syntax, language features, and fundamental concepts of these three technologies. Having a solid foundation will make it easier for you to follow along with the course and understand the code.
Also, ensure that you have the necessary software installed on your computer. As mentioned earlier, you need to have Notepad++ for coding. Additionally, make sure you have a web browser (such as Google Chrome or Mozilla Firefox) for testing your calculator in real-time.
Now that you have a comprehensive understanding of how to build a simple calculator using HTML, CSS, and Javascript, you are ready to start your coding journey. Keep practicing and exploring new projects to further enhance your skills. Happy coding!


 Huge Recruitment Drive | 2018 to 2024 Batch")