Last Updated on September 29, 2024 by GeeksGod
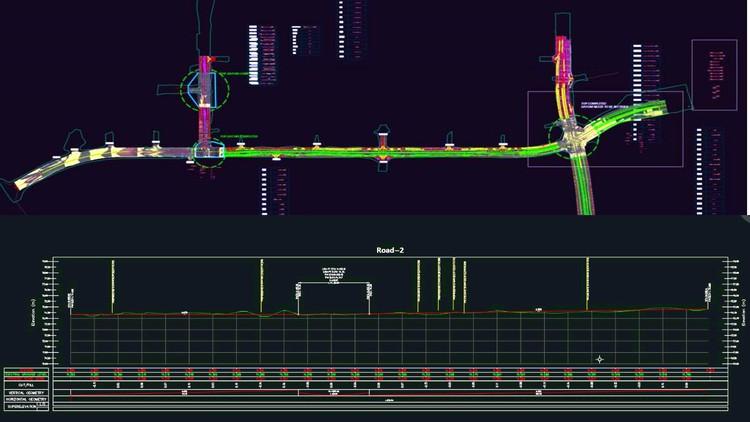
Course : AutoCAD Civil 3D 6km Complete Road & Junction Design Project
“`htmlAutoCAD Civil 3D Design: A Complete Guide for Beginners and Intermediate Users
Are you ready to dive into the intricacies of AutoCAD Civil 3D design? If you’re looking to enhance your skills and learn the essentials of effective road, highway, and junction design, you’ve landed in the right spot. This comprehensive guide will cover everything you need, including insights from a free Udemy coupon for AutoCAD Civil 3D design. Get comfortable as we explore an exciting journey into the world of civil design.
Course Overview: Mastering AutoCAD Civil 3D Design
This course is curated for both beginners and intermediate users. It aims to teach you how to produce efficient designs for roads, open channels, and roundabouts in AutoCAD Civil 3D. You might wonder, “What can I expect to learn?” Let’s break it down clearly:
- Importing points and basic settings
- Alignment creation tools and settings
- Surface profile and design profile creation
- Assembly and corridor creation
- Road cross-section creation
1. Import Points and Basic Settings
The first step in mastering AutoCAD Civil 3D design is understanding how to import points correctly. Here are some highlights:
- Adjust drawing settings and unit settings.
- Create points manually or import from CSV and TXT files.
- Edit point details and labels efficiently.
Isn’t it amazing how quickly you can set up your project with just a few clicks using AutoCAD Civil 3D? Think of it as laying the foundation for a solid structure.
2. Alignment Creation Tools and Settings
Now that you have your points, it’s time for alignment. Whether you’re drawing straight alignments or ones with curves, AutoCAD Civil 3D design is equipped with powerful tools to help you:
- Draw alignments without curves or with specified curvature.
- Edit your alignments as needed, using sub-entity editors.
- Visualize alignments using the grid view for better analysis.
Creating Surface and Design Profiles
3. Create Surface Profile
Your road design doesn’t stop at points and alignments. It’s crucial to develop a comprehensive surface profile. In this module, you’ll learn how to:
- Use profile creation tools for generating accurate profiles from existing surfaces.
- Adjust display options and height settings for optimal visualization.
- Customize data bands to reflect relevant information such as cut and fill areas.
Have you ever tried to visualize a road profile? It’s like seeing the line of a roller coaster—smooth transitions make for a better ride.
4. Design Profile on Existing Profile
Building on your surface profile, the next step is creating a design profile that integrates seamlessly with your existing layers.
- Incorporate vertical curve settings for a smoother design.
- Edit existing profile bands to reflect desired elevations.
- Create a new PVI (Point of Vertical Intersection) when needed.
Assembling Roads in Civil 3D
5. Create Assembly and Corridor in Civil 3D
In this essential section, you’ll learn to construct assemblies that account for various components such as lanes, shoulders, and barriers:
- Create the assembly baseline effectively.
- Edit sub-assembly parameters for customization.
- Analyze the 3D view of the road while adjusting parameters for better performance.
Think of creating a corridor like assembling a sandwich; each layer adds to the overall structure, making it functional and aesthetically pleasing.
6. Road Cross Section Creation
Cross sections offer a unique view of your design, allowing for detailed examination:
- Create multiple section views to highlight different aspects of your project.
- Adjust section properties such as elevation ranges and display options.
- Generate volume reports and change volume tables as needed.
It’s like pulling apart a book to examine the chapters; each section reveals a different part of your design story.
Finalizing Your Design
7. Drawing Template for Cross Sections
To wrap up, you’ll want to create a drawing template that can be used across various projects:
- Understand page setup and create custom paper sizes.
- Insert north arrows and scale bars for orientation.
- Create frames and sheets with your designed template for consistency.
This template acts as your canvas, allowing for professional presentations of your designs. Wouldn’t it be satisfying to display your work with such polish?
8. Complete Design Basis Report for Client
Finally, an effective design report is essential for communication with clients. Include:
- Design standards and project maps.
- Complete details on superelevation and spiral details.
- Table information for easy reference.
Imagine presenting this report—it’s like giving your client a blueprint to success.
Free Udemy Coupon: Enhance Your Learning Experience
If you’re excited about diving deeper into AutoCAD Civil 3D design and wish to access high-quality training materials, you’ve come to the right place! Don’t miss out on the opportunity to grab a Free Udemy Coupon for AutoCAD Civil 3D design. Courses that provide you hands-on experience and expert advice can accelerate your learning significantly.
Frequently Asked Questions (FAQs)
What are the prerequisites for this course?
You’ll need access to AutoCAD Civil 3D software, whether it’s the student, trial, or commercial version.
Can I use this course if I’m a beginner?
Absolutely! This course is designed for beginners and intermediate users alike.
How long will it take to complete the course?
The course duration varies but can typically be completed in a few weeks if you dedicate time consistently.
Is there a community or forum for learners?
Yes, joining forums or communities like CAD Forum can enhance your learning experience.
Conclusion
Learning to design with AutoCAD Civil 3D sets the groundwork for successful infrastructure projects. With the tools and techniques discussed in this guide, you can confidently tackle your next design challenge. Remember, don’t miss your chance to utilize that Free Udemy Coupon for AutoCAD Civil 3D design—it’s your gateway to mastering this vital skill. Happy designing!
“`


 Huge Recruitment Drive | 2018 to 2024 Batch")